Tutorial is based on Let’s Encrypt Release 0.5.0 and Nginx 1.6.3.
Last update 2017-01-10
Tested on Centos 7 1611
Background Links
- How To Secure Nginx with Let’s Encrypt on CentOS 7
- Certbot (formely known as Let’s Encrypt client
- Server Side TLS, Mozilla
Ansible deployment roles
Github: Ansible playbooks that comes with this aricle for full deployment
Introduction
Most tutorials that explain how to get a verified certificate from Let’s Encrypt, explain how to get a Let’s Encrypt certificate on a default Lamp or Lemp server. For the average Joe getting a verified certificate is an easy task. Things are getting a bit more complicated when the web traffic is being proxied through a load balancer or SSL off loader (from now on called: Nginx Proxy). This tutorial focuses on getting a verified certificate for a Nginx proxy server. To be able to use this tutorial you will need to be comfortable with the CLI,have already configured a Nginx proxy listing on port 80 and punctured two holes in the firewall: port 443 and port 80. On top of this I will explain how to set the SELinux policies of the document root (This tutorial is based on Centos 7 and we use SElinux anyway, right?). And yes, I known: SSL should be TLS.
Installation of Let’s Encrypt
The only thing that needs to be installed before installing the Github repositorie of Let’s Encrypt Certbot will be Git and a precision calculator called BC.
sudo yum install git bc
Pulling the Certbot of Let’s Encrypt and getting the document root ready
sudo git clone https://github.com/letsencrypt/letsencrypt /opt/letsencrypt
sudo mkdir -p  /var/www/letsencrypt
sudo chcon -v -R --type=httpd_sys_content_t  /var/www/letsencrypt
Example vhost configuration file on port 80
When proxying all traffic to a backend, you will run into the problem of validating the certificate. This is because Let’s Encrypt (in this method) will try to place a file in the document root, but of course this is not possible since the final destination will be on another server. Most examples I encountered gave examples of unstable and bloated solutions such as Samba shares and SSHFS. In my humble opinion I tent think this solution is better, more transparent and safer. I will do this by excluding a location in the Nginx vhost configuration file. Everything that will request this location will be forwarded to the document root of the Proxy server and not a back end. If you are searching for a straight forward way to setup a simple LEMP server or VPS, I can recommend this tutorial.
Create a vhost configuration similiar as this in /etc/nginx/conf.d/
server {
	listen   80;
        server_name maikel.tiny-host.nl;
	root /usr/share/nginx/www;
	#rewrite ^ https://maikel.tiny-host.nl$1 permanent; <-- enable this after getting the certificate

	#Letsencrypt part
	location  /.well-known   {
		root /var/www/letsencrypt;
        }
}
Check the syntax Nginx and reload Nginx. Nginx will not be reloaded if the syntax is not correct.
sudo nginx -t && sudo systemctl reload nginx
Obtain the certificate
Obtaining the certificate is easy, but on the first run Let’s Encrypt will install all the dependencies. This is a lot and can take a while. Also you will be asked to type in your existing email address in a ncurses menu. Let’s Encrypt will mail you when your certificate is about to expire. Behind -d flag define your domain or sub domain. When everything has been answered and done right, you will get a congratulations text with an explanation where to find your new certificates.
sudo /opt/letsencrypt/letsencrypt-auto certonly -a webroot --webroot-path=/var/www/letsencrypt -d maikel.tiny-host.nl;
Enabling SSL and setting the SSL paths
I’ll not explain which cipher suites will be the best or what kind of size you need of your Diffie Helman key. This is merely an example (don’t take this example for granted!), but take this vhost configuration file as a lead. First you will need to generate a Diffie Helman key. Read here why.
sudo openssl dhparam -out /etc/ssl/certs/dh2048.pem 2048
Add edit the configuration in the vhost file you created before:
server {
	listen   80;
        server_name maikel.tiny-host.nl;
	root /usr/share/nginx/www;
	rewrite ^ https://maikel.tiny-host.nl$1 permanent;
	#Letsencrypt part
	location  /.well-known   {
		root /var/www/letsencrypt;
        }


}

###General SSL part. Please check if this is still valid.
        ssl_certificate /etc/letsencrypt/live/voorbeeld.nl/fullchain.pem;
        ssl_certificate_key /etc/letsencrypt/live/voorbeeld.nl/privkey.pem;
        ssl_protocols TLSv1 TLSv1.1 TLSv1.2;
        ssl_prefer_server_ciphers on;
        ssl_dhparam /etc/ssl/certs/dh2048.pem;  <-- #this needs to created by yourself! openssl dhparam -out /etc/ssl/certs/dh2048.pem 2048
        ssl_ciphers 'ECDHE-RSA-AES128-GCM-SHA256:ECDHE-ECDSA-AES128-GCM-SHA256:ECDHE-RSA-AES256-GCM-SHA384:ECDHE-ECDSA-AES256-GCM-SHA384:DHE-RSA-AES128-GCM-SHA256:DHE-DSS-AES128-GCM-SHA256:kEDH+AESGCM:ECDHE-RSA-AES128-SHA256:ECDHE-ECDSA-AES128-SHA256:ECDHE-RSA-AES128-SHA:ECDHE-ECDSA-AES128-SHA:ECDHE-RSA-AES256-SHA384:ECDHE-ECDSA-AES256-SHA384:ECDHE-RSA-AES256-SHA:ECDHE-ECDSA-AES256-SHA:DHE-RSA-AES128-SHA256:DHE-RSA-AES128-SHA:DHE-DSS-AES128-SHA256:DHE-RSA-AES256-SHA256:DHE-DSS-AES256-SHA:DHE-RSA-AES256-SHA:AES128-GCM-SHA256:AES256-GCM-SHA384:AES128-SHA256:AES256-SHA256:AES128-SHA:AES256-SHA:AES:CAMELLIA:DES-CBC3-SHA:!aNULL:!eNULL:!EXPORT:!DES:!RC4:!MD5:!PSK:!aECDH:!EDH-DSS-DES-CBC3-SHA:!EDH-RSA-DES-CBC3-SHA:!KRB5-DES-CBC3-SHA';
        ssl_session_timeout 1d;
        ssl_session_cache shared:SSL:50m;
        ssl_stapling on;
        ssl_stapling_verify on;
        add_header Strict-Transport-Security max-age=15768000;

	#Letsencrypt part
	location  /.well-known   {
	root /var/www/letsencrypt;
	allow all; #Allow everyone to connect
	}

	location / {
            proxy_redirect off;
            proxy_set_header Host $host;
            proxy_set_header X-Real-IP $remote_addr;
            proxy_set_header X-Forwarded-For $proxy_add_x_forwarded_for;
            proxy_set_header        X-Real-IP       $remote_addr;
            proxy_set_header        X-Forwarded-For $proxy_add_x_forwarded_for;
            proxy_pass   http://192.168.0.2:80;
        }
Check the syntax of Nginx and reload Nginx. Nginx will not be reloaded if the syntax is not correct. (!) Checking the syntax of Nginx becomes even more important when you automatically reload Nginx, so teach yourself this work flow.
sudo nginx -t && sudo systemctl reload nginx
Check your SSL settings
By now if you followed this tutorial step by step you will have a verified (and gratisch) certificate of Let’s Encrypt, but you are not there yet! Always check a new vhost with SSL on SSLLabs and debug until you get a A or A+ grade. You can find SSLLabs here .
Automatic renewal of the certificate
The steps above are a one time show, but do not forget: They are only valid for 90 day’s. It would be a big hassle to request every 90 day’s the certificates. So, the general approach is to automate this (and being subjected to heated debates). You can do this with a cronjob.
sudo crontab -e
15 3 * * 1 /opt/letsencrypt/letsencrypt-auto renew
30 3 * * 1 /usr/bin/systemctl reload nginx
Stretching the limits of Let’s Encrypt
Don’t expect to find all your TLS solutions with Let’s Encrypt. It ‘only’ gives basic certificates, so no extended validation or wild card certificates. However Let’s Encrypt offers 100 domain SAN (a.ka. multidomain) certificates. So, to proof this for fun and giggles, I recently build myself a 100 domain certificate:
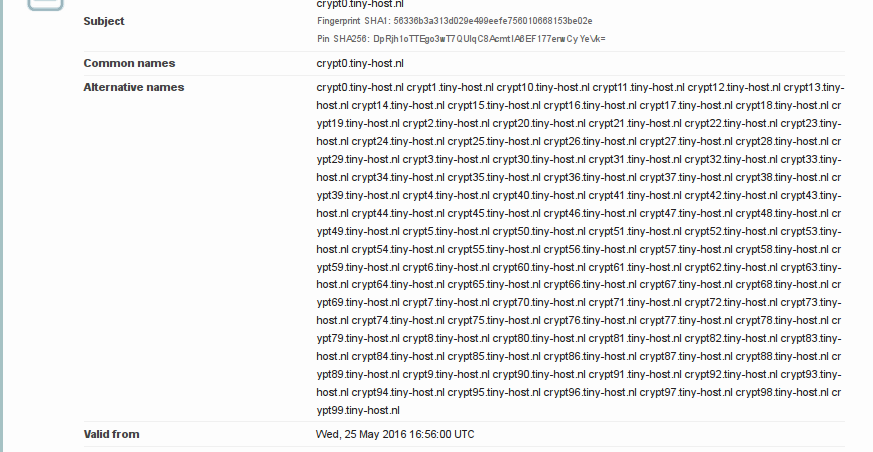
San certificates can be made with multi able -d flags defined. I created this bizarre oneliner to request the 100 san certificate:
sudo /opt/letsencrypt/letsencrypt-auto certonly -a webroot --webroot-path=/var/www/letsencrypt -d crypt0.tiny-host.nl -d crypt1.tiny-host.nl -d crypt2.tiny-host.nl -d crypt3.tiny-host.nl -d crypt4.tiny-host.nl -d crypt5.tiny-host.nl -d crypt6.tiny-host.nl -d crypt7.tiny-host.nl -d crypt8.tiny-host.nl -d crypt9.tiny-host.nl -d crypt10.tiny-host.nl -d crypt11.tiny-host.nl -d crypt12.tiny-host.nl -d crypt13.tiny-host.nl -d crypt14.tiny-host.nl -d crypt15.tiny-host.nl -d crypt16.tiny-host.nl -d crypt17.tiny-host.nl -d crypt18.tiny-host.nl -d crypt19.tiny-host.nl -d crypt20.tiny-host.nl -d crypt21.tiny-host.nl -d crypt22.tiny-host.nl -d crypt23.tiny-host.nl -d crypt24.tiny-host.nl -d crypt25.tiny-host.nl -d crypt26.tiny-host.nl -d crypt27.tiny-host.nl -d crypt28.tiny-host.nl -d crypt29.tiny-host.nl -d crypt30.tiny-host.nl -d crypt31.tiny-host.nl -d crypt32.tiny-host.nl -d crypt33.tiny-host.nl -d crypt34.tiny-host.nl -d crypt35.tiny-host.nl -d crypt36.tiny-host.nl -d crypt37.tiny-host.nl -d crypt38.tiny-host.nl -d crypt39.tiny-host.nl -d crypt40.tiny-host.nl -d crypt41.tiny-host.nl -d crypt42.tiny-host.nl -d crypt43.tiny-host.nl -d crypt44.tiny-host.nl -d crypt45.tiny-host.nl -d crypt46.tiny-host.nl -d crypt47.tiny-host.nl -d crypt48.tiny-host.nl -d crypt49.tiny-host.nl -d crypt50.tiny-host.nl -d crypt51.tiny-host.nl -d crypt52.tiny-host.nl -d crypt53.tiny-host.nl -d crypt54.tiny-host.nl -d crypt55.tiny-host.nl -d crypt56.tiny-host.nl -d crypt57.tiny-host.nl -d crypt58.tiny-host.nl -d crypt59.tiny-host.nl -d crypt60.tiny-host.nl -d crypt61.tiny-host.nl -d crypt62.tiny-host.nl -d crypt63.tiny-host.nl -d crypt64.tiny-host.nl -d crypt65.tiny-host.nl -d crypt66.tiny-host.nl -d crypt67.tiny-host.nl -d crypt68.tiny-host.nl -d crypt69.tiny-host.nl -d crypt70.tiny-host.nl -d crypt71.tiny-host.nl -d crypt72.tiny-host.nl -d crypt73.tiny-host.nl -d crypt74.tiny-host.nl -d crypt75.tiny-host.nl -d crypt76.tiny-host.nl -d crypt77.tiny-host.nl -d crypt78.tiny-host.nl -d crypt79.tiny-host.nl -d crypt80.tiny-host.nl -d crypt81.tiny-host.nl -d crypt82.tiny-host.nl -d crypt83.tiny-host.nl -d crypt84.tiny-host.nl -d crypt85.tiny-host.nl -d crypt86.tiny-host.nl -d crypt87.tiny-host.nl -d crypt88.tiny-host.nl -d crypt89.tiny-host.nl -d crypt90.tiny-host.nl -d crypt91.tiny-host.nl -d crypt92.tiny-host.nl -d crypt93.tiny-host.nl -d crypt94.tiny-host.nl -d crypt95.tiny-host.nl -d crypt96.tiny-host.nl -d crypt97.tiny-host.nl -d crypt98.tiny-host.nl -d crypt99.tiny-host.nl
Current limits of Let’s Encrypt can be found here
Final notes
And remember kids, the web of trust is broken.